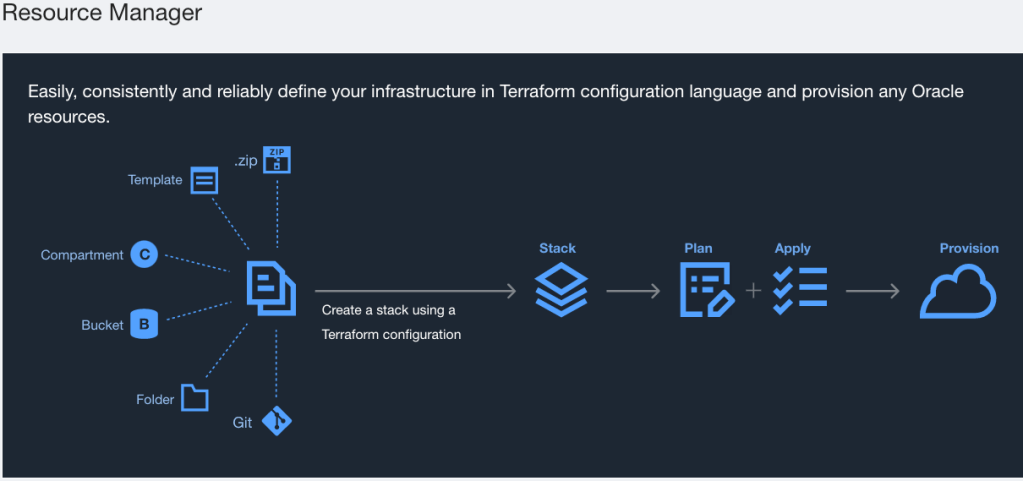
I’ve grown to really appreciate Oracle’s Resource Manager Service (RMS) as a method to implement infrastructure as code using a standard tool like Terraform, but without the headache of managing a Terraform server. The recent addition of private endpoints has been a huge improvement in the security posture of this product. One area that I’ve always found intriguing is that of private templates.
Private templates are essentially Terraform Stacks that are templated and made available to be deployed over and over. They are the very thing that allows for Oracle’s Cloud Marketplace to quickly deploy solutions from software vendors. Until recently, I struggled to really understand how to create a private template. To understand it better, I borrowed some code, dissected it, and did my best to understand how it all worked. I’m going to lay out here what it is that I learned.
I now understand the key principle: RMS templates are simply Stacks. You can take any Terraform configuration that you would deploy as an RMS Stack and create a Private Template by uploading that configuration using the Private Templates page.
The part that really alluded me was how to get the RMS UI to work like I see when deploying a Stack from the Marketplace. That’s where the schema.yaml file comes into play.
Please note, the rest of this post assumes you are familiar with Terraform and what it takes to use Terraform with RMS. You’ve been warned, proceed if you dare.
The Schema File
The interesting thing I found about this file called schema.yaml is that it appeared to have something to do with the variables, but it was a bit tricky to make sense of it all. To be fair, I’m not a YAML guy. Give me JSON any day of the week (and yes, I know they are related).
After digging a bit, I found Oracle’s documentation on the schema.yaml file. As it turns out, you can use this file to organize and manage the UI of RMS for any Stack, including a Private Template.
Nuances
First, I recommend grabbing a Stack from something like the Cloud Marketplace or OCI Architecture Center to get a good example. Then, read and understand the documentation about this file. That’s going to answer a lot of questions. If you’re not familiar with YAML files, I recommend doing a little research. Here’s a hint: spacing matters!
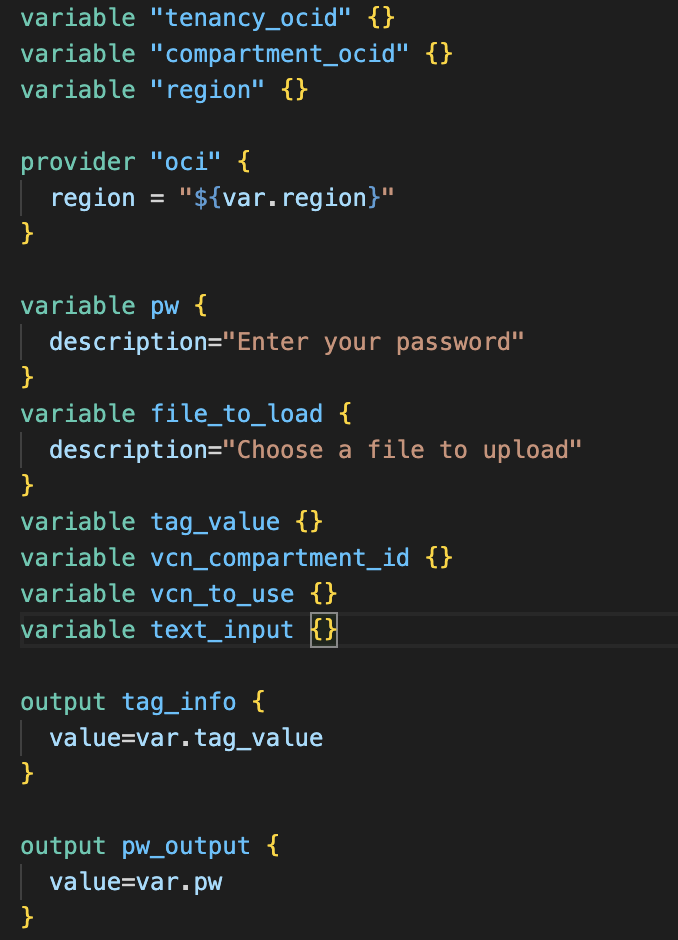
Next, after following the documentation, I found some interesting nuances just playing around. I created a simple Terraform configuration that didn’t build anything. I just loaded variables and provided some outputs.
- You need to define all of the necessary Terraform variables to make the input usable. This might seem obvious, but you can add a variable to the schema file that is not in your defined Terraform variables. What’s interesting here is that you can use that variable to manage the UI, but you just cannot call it in your Terraform. So if you wanted to include a checkbox to control the visibility of other variables, you don’t need a Terraform variable for this. This could be a good option to just fall back to whatever your variable default is in the Terraform script.
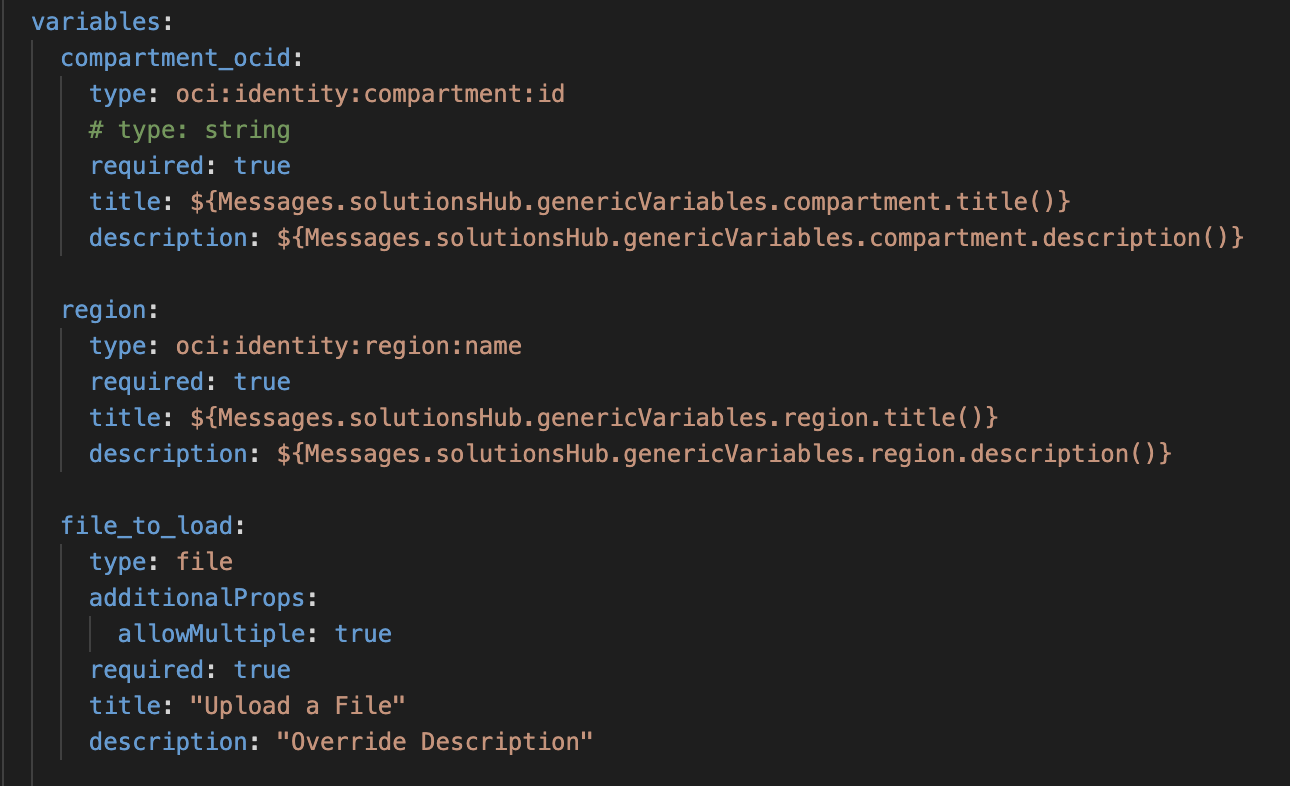
- The variables you define in the schema.yaml file MUST be the same name as those defined in your Terraform config. If you don’t do this, you’ll see two fields for the same thing. One will correspond to what you defined in the schema.yaml file and one will correspond to the variable you defined in the Terraform config.

- Anything you put in the schema.yaml file will override what you have in the variables file. For example, if you define a description for the variable in the Terraform config, the description you add to the schema file will override the description the user sees.


Notice the description shown below the upload dialog in comparison to what’s defined in the schema.yaml vs. tf file.
- Using the output section of the schema.yaml file adds a tab to your job called “Application Information”. This allows you to expose your outputs to a tab on your RMS Stack. This is really useful for providing information to end-users, but be warned, you need to use the features of the schema.yaml file to control that output. The aforementioned documentation provides some good information. One thing it does not indicate is that if you create an output section in the schema.yaml file, define an output in your Terraform config, but do not specify that output in the schema file, the output will appear on the Application Information tab without your control.


Notice “Tag Info” is not defined in the schema file, but since it is an output from Terraform, it appears on the “Application Information” tab.
- If you define a variable in the schema.yaml file, but don’t add it to a variable group, it will be added to the end of the variables page. This is interesting because part of the value of using the schema file is to manage the flow and format of the input from the user. Just having variables added to the end without rhyme or reason tends to defeat the purpose.
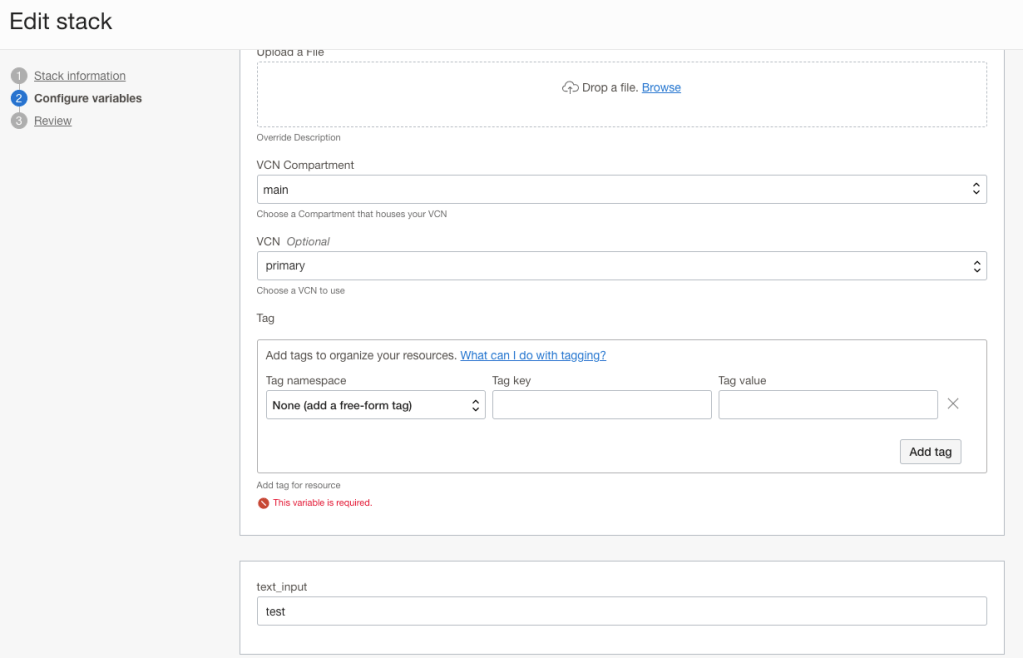
Notice the box at the bottom for “text_input”. That was a variable defined in the Terraform config, but not defined in the schema.yaml file.
- The dependsOn part of a variable definition is super valuable. A lot of inputs you might gather, like VCN OCID requires that you identify the compartment in which it resides. Without this clause, RMS doesn’t know where to look for the VCN. This solves a major headache I’ve run into using RMS without schema.yaml. In that case, users have to know OCIDs vs. using schema.yaml where they can select the input logically.
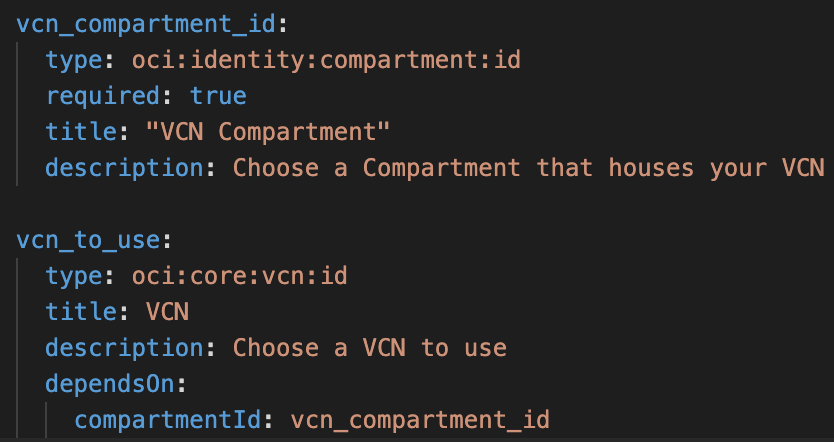
Choosing a VCN in this case without the proper Compartment won’t work and is enforced by the UI.
The one thing I have not yet found documentation about is how to use the pre-defined values OCI provides via the Messages.solutionsHub.solutions variables. Somewhere, somehow these are defined, but it’s unclear where or how. If you happen to know, it’d be great to get some more information to add.
